
Voice Command
Demo video
Function introduction
Using this module, you can control the Petoi robot to perform various skills through voice without using wake words. Currently, the module supports 35 fixed voice commands in two languages (English and Chinese) and ten customized commands by recording any sound clips.
Hardware setup
It is built into the BiBoard V1 as follows:

Software setup
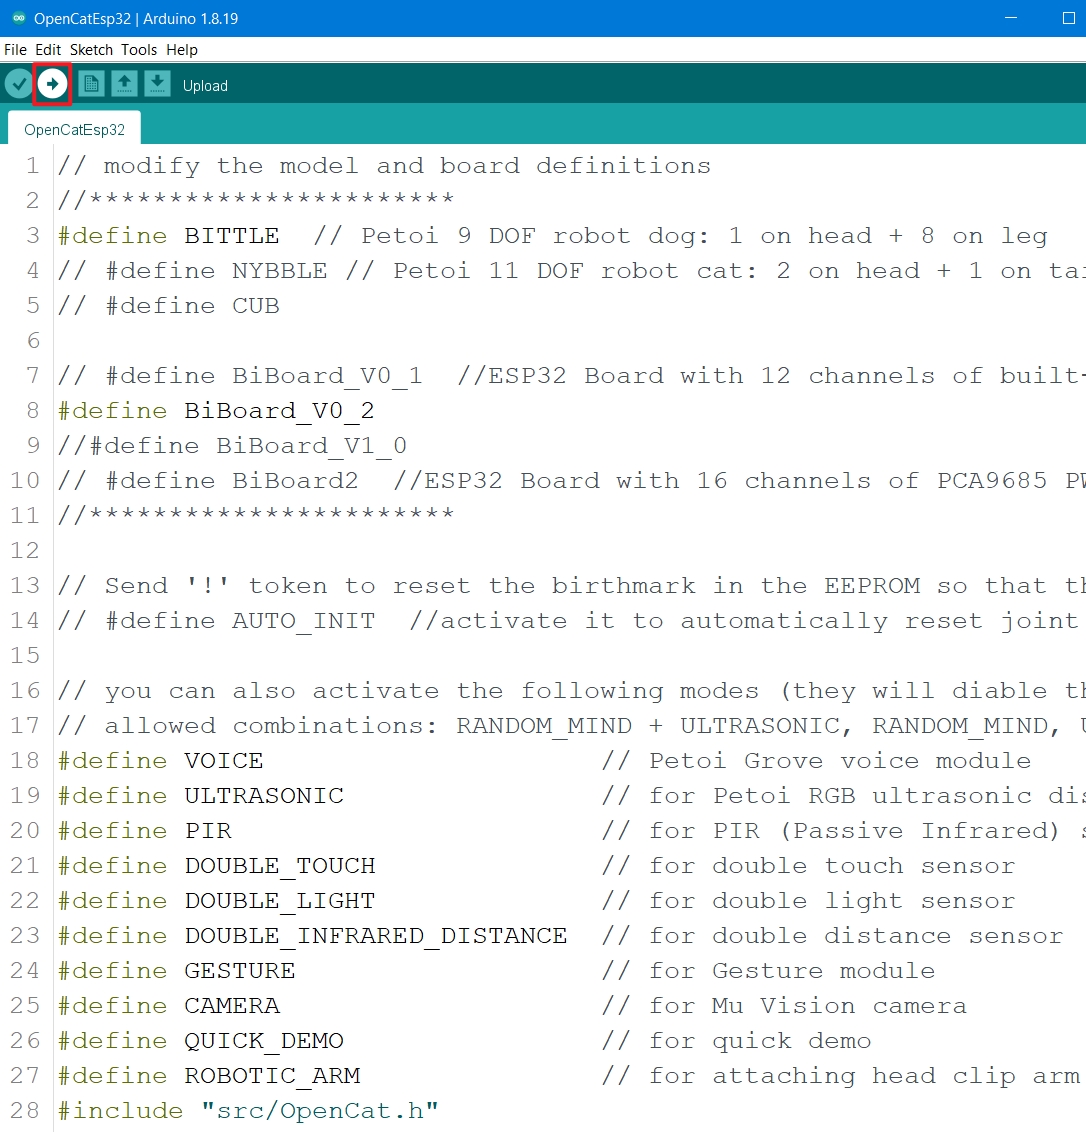
1. Upload Firmware
There are two methods to upload the firmware for the robot.
use the Petoi Desktop App
use the Arduino IDE
Petoi Desktop App
You can use the Firmware Uploader within the Petoi Desktop App.
Please select the correct Product type, Board version, and Serial port. The mode should be Standard, so press the Upgrade the Firmware button.

Arduino IDE
You can use Arduino IDE to upload the sketch(OpenCatEsp32.ino).
Modify the product type macro definition in OpenCatEsp32.ino according to the product type you used.
Modify the mainboard model macro definition in OpenCatEsp32.ino according to the mainboard (BiBoard) version.
If the robot(Bittle X+Arm) has the robotic arm, you should also activate the macro definition as follows:
Otherwise, please comment out this line of code.
After the modification is completed, you can click the Upload button (as below) to upload the sketch OpenCatEsp32.ino, and the changes in the code file will be automatically saved.
2. Switch mode
After uploading, the program defaults to Voice mode. If it is in another mode and you want to switch to Voice mode, please open the Serial Monitor and send the XA command.
Play with the voice commands
Common use cases
Set the default language
When the robot is restarted, the voice module is automatically reset to its default language setting, which is English.
There are two ways to set the default language:
Using the serial commands
Open the serial monitor:
To set the default language to English, use the command:
XAa.To set it to Chinese, use the command:
XAb.
In the mobile app:
To set the default language to English, create a command called English and use the code:
X65,97.To set it to Chinese, create a command called Chinese and use the code:
X65,98.
Using the voice commands
To set the default language to English, you need to say the voice command "Lizheng" (phonetic) first and then say "Bing-Bing" (phonetic).
To set it to Chinese, you need to say the voice command "Attention" first and then say "Di-Di"(phonetic).
Switch the language
To switch to English, you can say "Bing-Bing" (phonetic)
Switch to Chinese, you can say "Di-Di" (phonetic)
Turn on/off the voice command functionality(audio response and robotics reaction)
To turn on
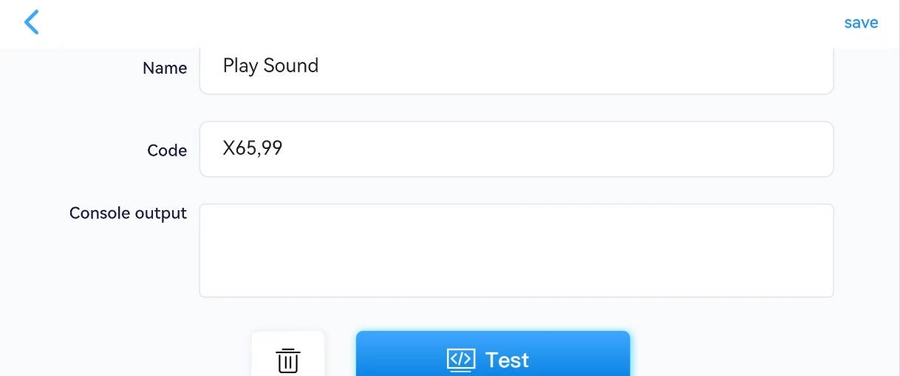
Speak Play sound
Create a command called "Enable voice" and use the code:
X65,99
To turn off
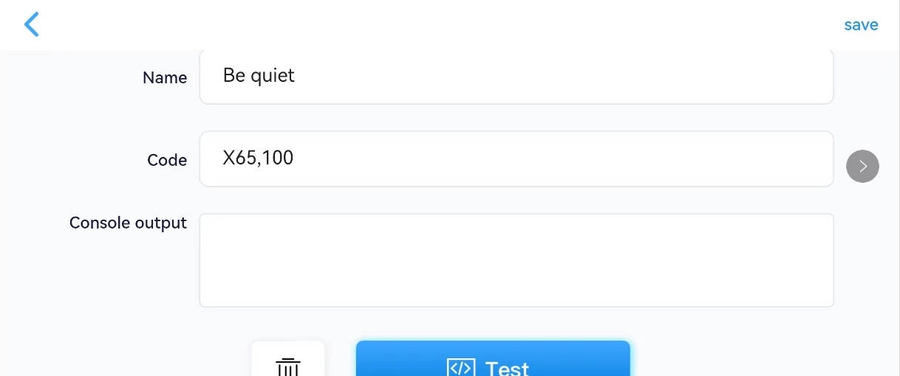
Speak Be quiet
Create a command called Disable voice and use the code:
X65,100
Use the predefined voice commands
The voice command list for Nybble / Nybble Q:

See this doc for the latest version.
To avoid inadvertently triggering the robot to respond to voice commands, you can say Be quiet to the robot to disable the voice module, such as when talking with others.
If the above voice commands don't take effect in English mode, try to use the mobile app and create a new button with the code: X65,100, or input XAd in the serial monitor to disable the voice module.
 You can say Play sound to the robot to enable the voice module.
Use the mobile app and create a new button with the code: X65,99, or input XAc in the serial monitor to enable the voice module.
The voice command Climb-up is a challenge for you. You can design the behavior by yourself. Then, you can post it on the Petoi Forum Challenge or email [email protected]. We may adopt it in our official firmware and send you a gift!
For example, you can share your behavior like this:
How to debug if the voice command doesn't work
In some cases, the voice module may not respond to your voice. Please check the following:
1. Say Play sound to check if the robot responds with Do-Me-So. Sometimes, the voice may be accidentally set to muted mode, triggered by Be Quiet.
2. If the module doesn't make any sound with Play sound, say Bing-Bing to switch to English mode. You may try different tones and speeds to say Bing-Bing. The robot should respond with Switch English if not in English mode. It won't react with anything if it's already in English.
3. If the voice module still doesn't make any sound, you can try to reset it in our software tools.
- Mobile app:
From version 1.2.0 of the mobile app, you can create a new button with the compound code:
^X65,99;!1000;X65,98;!1000;X65,97To reset the voice module to English mode.
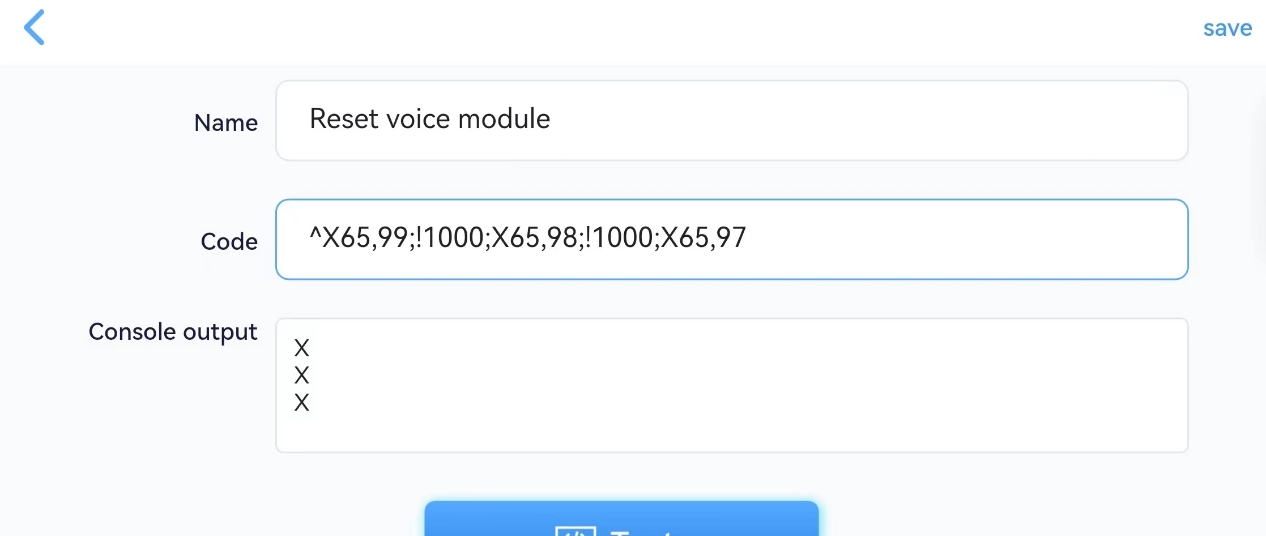
X65,99, or inputXAcin the serial monitor enables the voice module.X65,97or inputXAain the serial monitor is equivalent to saying Bing-Bing, but excludes the chance that the voice is not recognized. Then you can try to say Play sound again.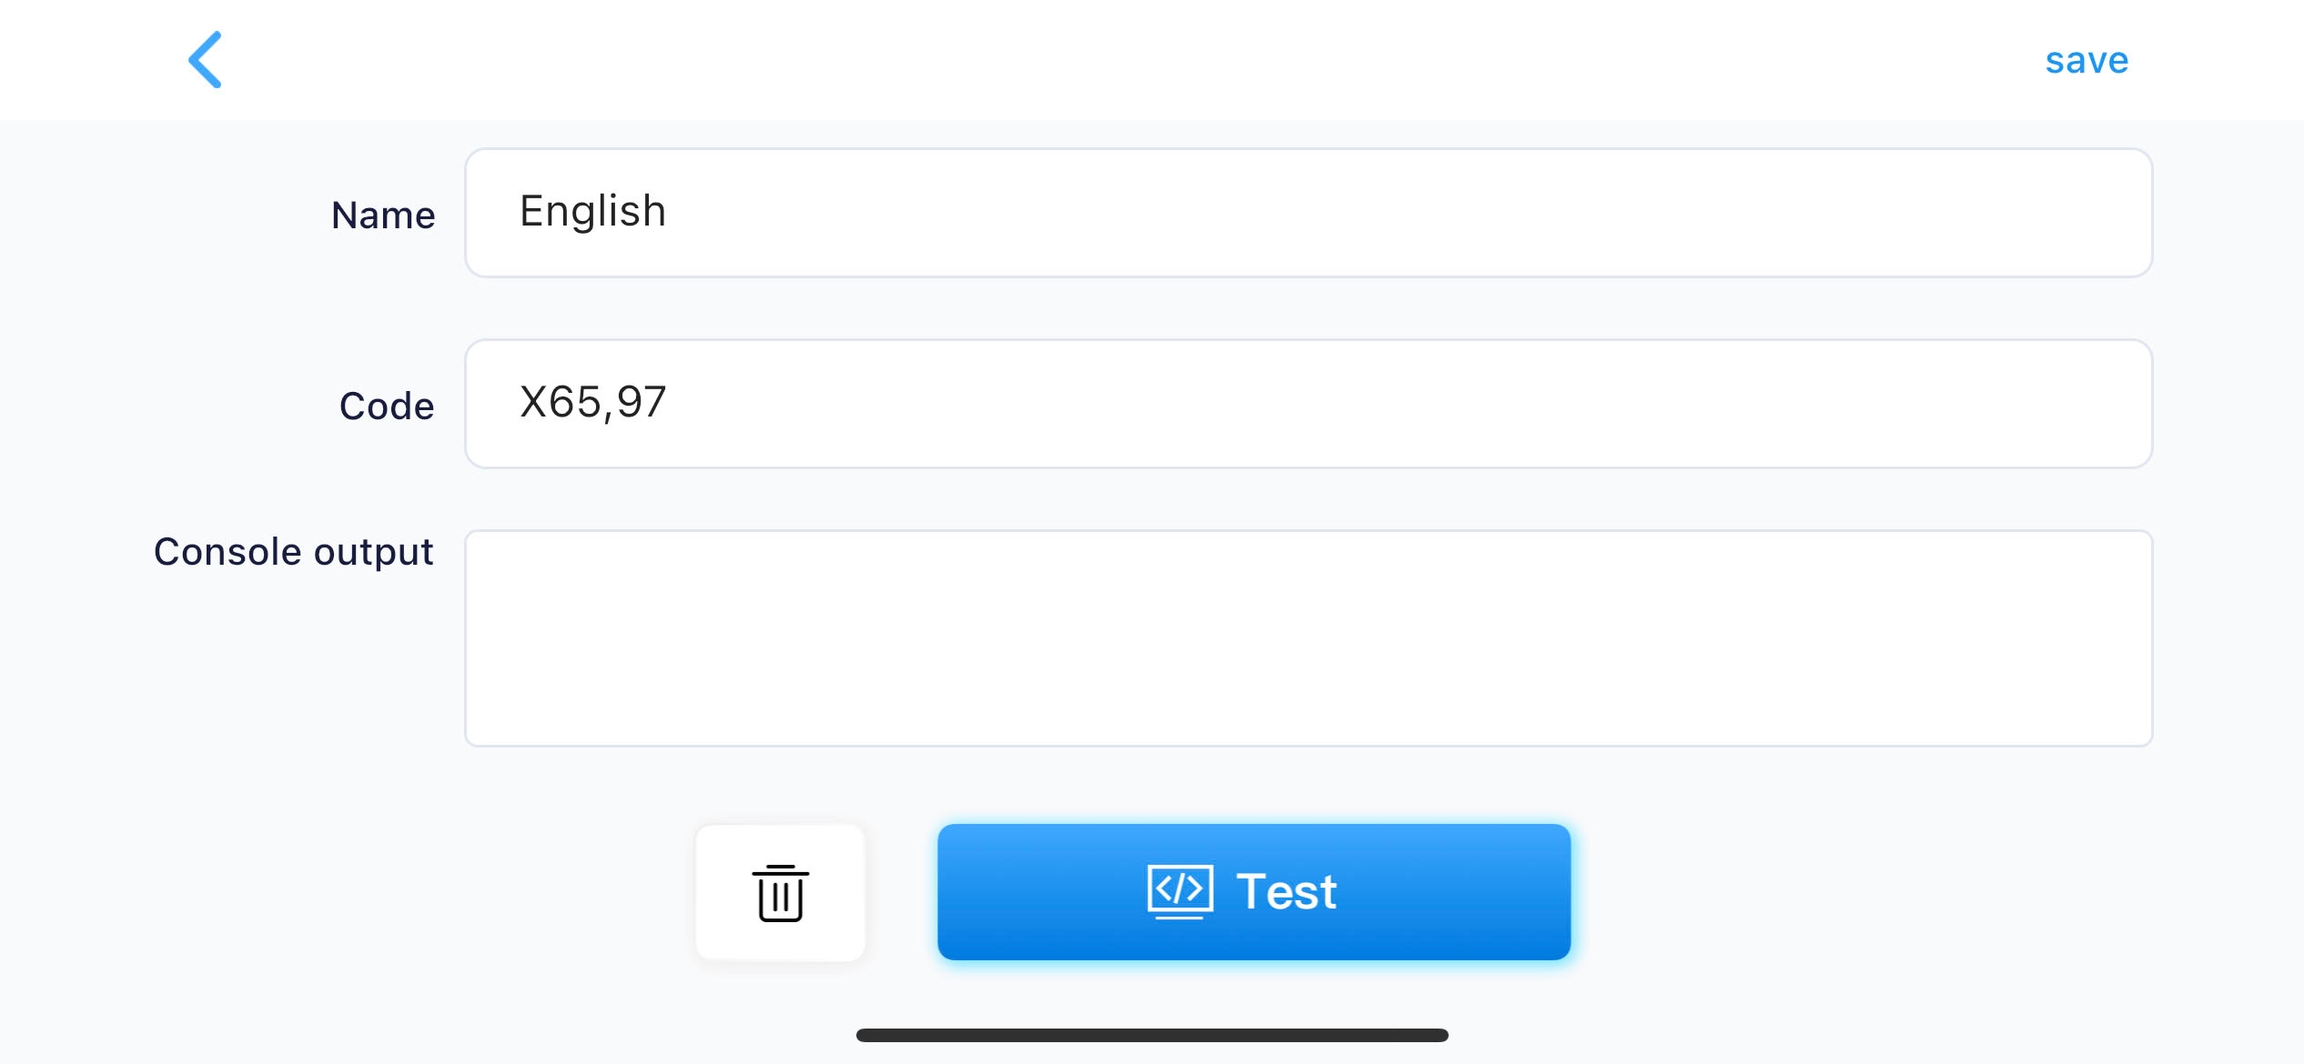
- Desktop app:
From version 1.2.1, you can use the debugger tool to reset the voice module.
Next, if you say Hello, the robot should wave its hand and validate that the complete reaction loop is good. Then, you can try other voice commands.
Try powering off the mainboard by disconnecting the USB data cable, long-pressing the battery's button, and then re-powering the mainboard.
The above steps validate that the voice module is working. It's powered separately from the motion unit and should work regardless of the robot's status.
If the above steps cannot fix the problem, contact [email protected] for help.
Record customized voice commands
When the robot works in English mode, you can speak Start learning (or input the serial command XAe in the serial monitor) into the custom voice command mode and record your voice commands in order.
You can record up to 10 voice commands, each with no more than six syllables.
To exit the custom voice command mode in the middle, you can speak Stop learning (or input the serial command XAf in the serial monitor).
After leaving the custom voice command mode, please speak one of the recorded voice commands to trigger the reaction.
Speak Clear the learning data to delete all the recordings simultaneously (you cannot delete a specific recording).
There are ten skill strings as custom replies already defined in the voice.h:
The response actions (kpu1 means single-handed pushups, kmw means moonwalk) are already defined in the program.
Other serial commands are also supported as responses, such as joint movements(e.g. m0 80 0 -80 means shaking the head left and right) and playing a melody(e.g. b14,8,14,8,21,8,21,8,23,8,23,8,21,4)
To use these custom replies above, you need to enter the custom voice command mode, record ten voice commands (such as Single-handed Pushup, Shake Head, Moonwalk, Twinkle Star), and then exit the custom voice command mode.
If you have recorded a voice command and the corresponding custom reply is not a predefined serial command (e.g.,6th), there is no actual demonstration effect; it only prints a simple message on the serial monitor when you speak the corresponding voice command.
Advanced usage for developers
Understand the principle
Convert the voice command collected by the microphone in the module into a serial command.
Send the serial command to the mainboard MCU through the soft serial port Serial2.
After receiving the serial command, the MCU parses it into the corresponding skill command, and finally, the reaction module, according to the skill command, controls the robot to respond accordingly.
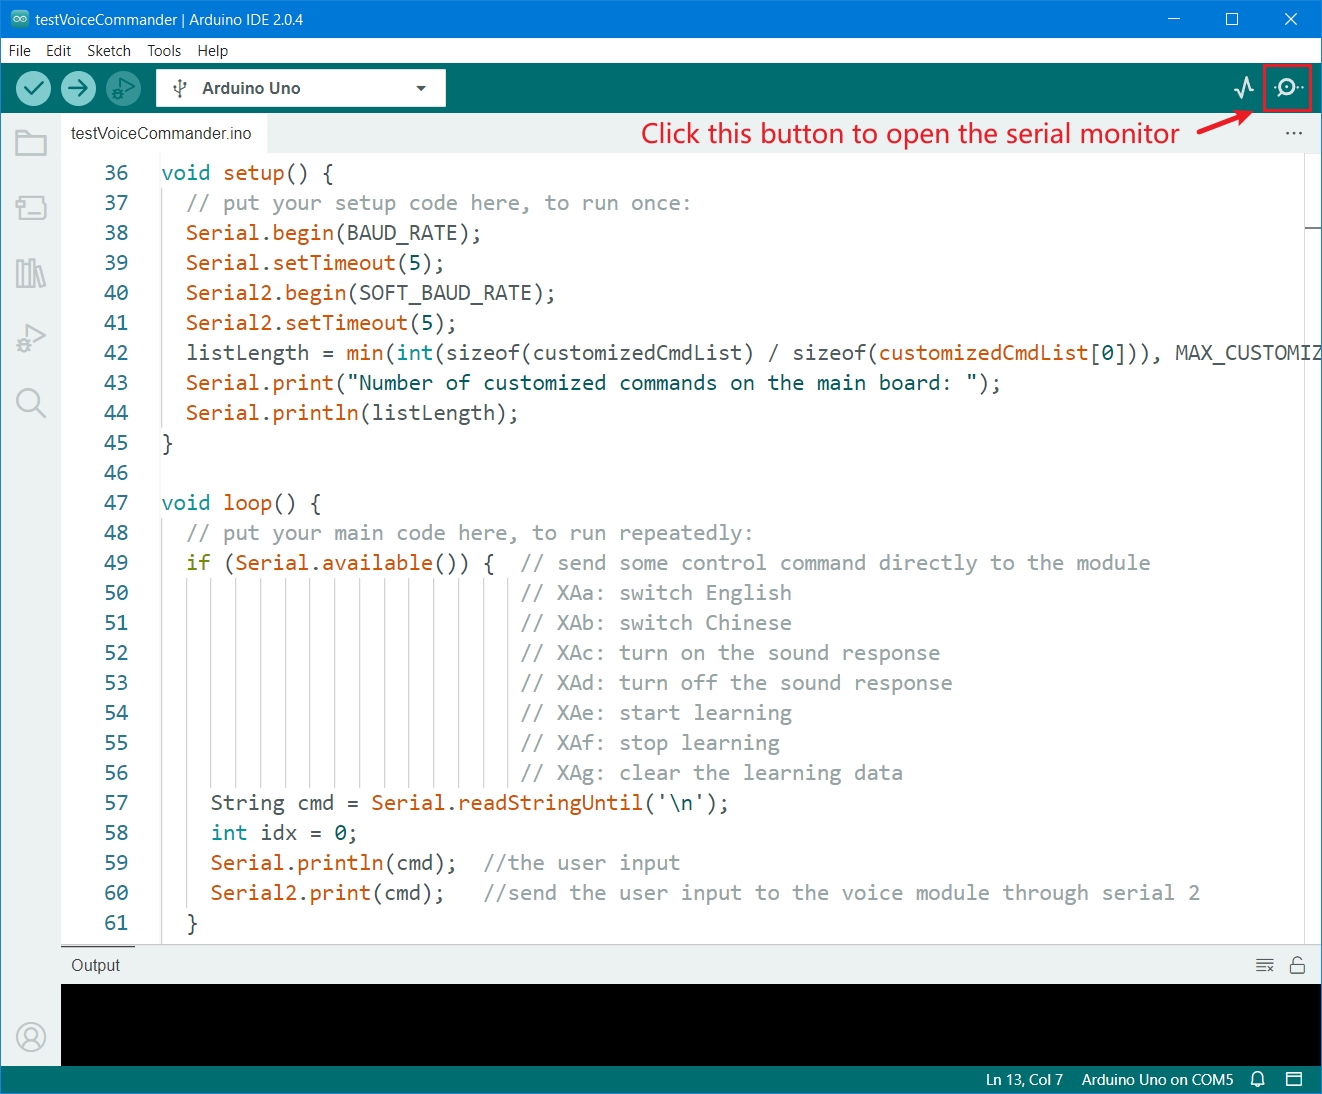
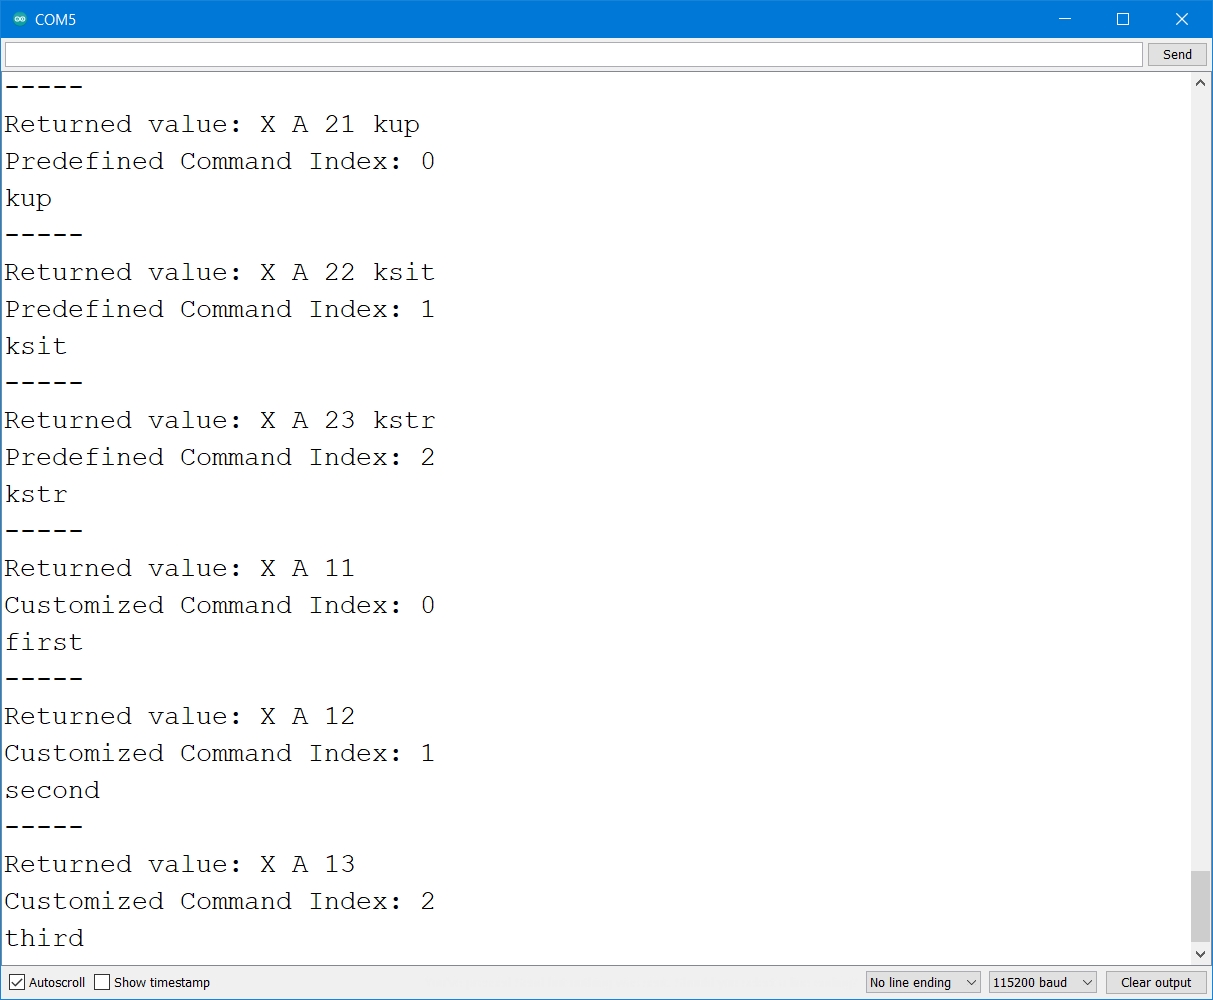
Upload the demo sketch testVoiceCommander.ino, and you can see every serial command that is sent to MCU(including the custom voice command if you have recorded it)
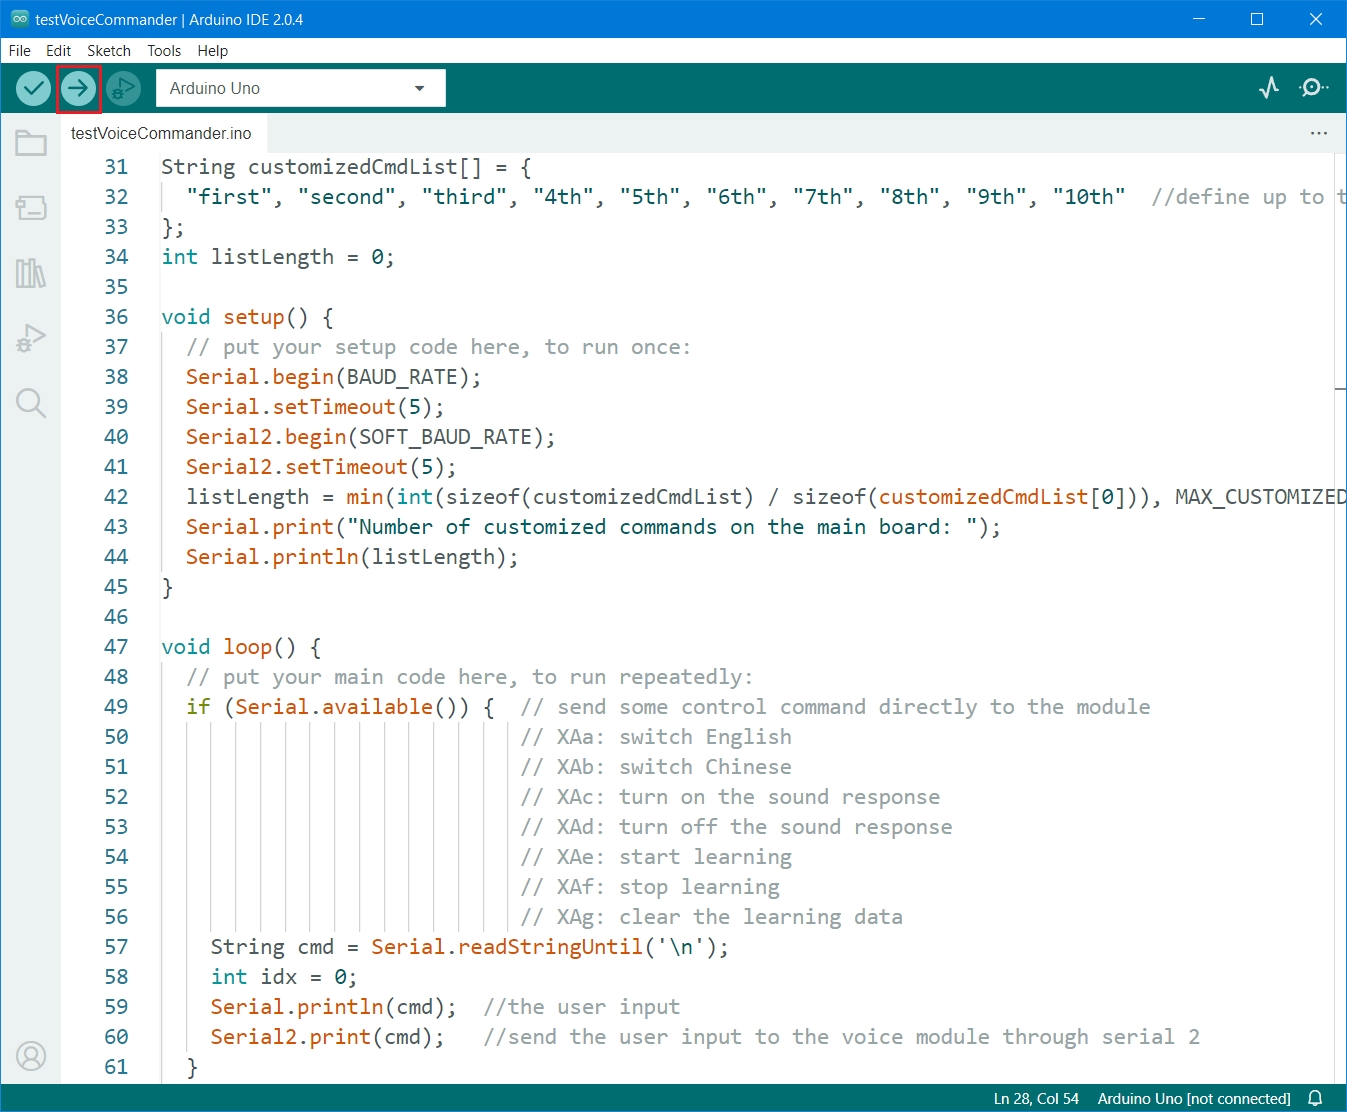
You can open the serial monitor to check the raw return values of every voice command.
The test sketch
The test sketch is in the OpenCatEsp32 repository on GitHub (specific path: OpenCatEsp32/ModuleTests/testVoiceCommander). You can visit our GitHub repository https://github.com/PetoiCamp/OpenCatEsp32 to download the complete code, as shown in the following picture:

Serial interface
There are seven related serial commands for configuration; you can input them into the serial monitor.
XAa
X65,97
Set the default language to English
XAb
X65,98
Set the default language to Chinese
XAc
X65,99
Turn on the reply tone and enable reaction
XAd
X65,100
Turn off the reply tone and disable reaction
XAe
X65,101
Enter custom voice command mode
XAf
X65,102
Exit custom voice command mode
XAg
X65,103
Delete all the custom voice commands
How to design new reactions
For the robot in Voice mode, to improve the utilization rate of custom voice control commands, you can modify the last six skill strings to the skill names with actual action responses.
Using the task queue to create a sequence of motions, please refer to the source code in the
voice.has below:
const char *cmd = raw.c_str() + shift;
tQueue->addTask(token, shift > 0 ? cmd : "", 2500);
if (strlen(cmd) > 0) {
  char end = cmd[strlen(cmd) - 1];
  if (!strcmp(cmd, "bk") || !strcmp(cmd, "x") || end >= 'A' && end <= 'Z') {
    tQueue->addTask('k', "up");
  }
}Using the Skill Composer and binding the customized voice command to the new skills
Use SkillComposer to design new skills and then export them into
Instinct***.hModify voice.h to bind the customized voice command to the new skills: modify the
customizedCmdList[](e.g., If you want to bind the sixth customized voice command to the new skill, replace the string "6th" with'k'+the new skill name)
Last updated