> For the complete documentation index, see [llms.txt](https://guide.petoi.com/llms.txt). Markdown versions of documentation pages are available by appending `.md` to page URLs; this page is available as [Markdown](https://guide.petoi.com/extensible-modules/ai-conversation.md).
# AI conversation
This module is built upon the open-source XiaoZhi AI chatbot project. Connecting to the XiaoZhi backend server enables conversations with an LLM, while the robot dog performs unique, skill-based movements synchronized with the conversation's content.
AI conversation lets the Petoi robot respond in natural language. This guide explains the required hardware setup and workflow for building an interactive robot companion.
## Hardware setup
1. Remove the original head unit from the head servo and replace it with the AI-enabled head unit.\

2. Connect the AI-enabled head to the Bittle body, paying close attention to the Grove port connections. \
If you wire this AI module BiBoard V1 without voice module:
BiBoard V1 without voice module
\
\
If you wire this AI module to the BiBoard V1 with the voice module, please refer to the following picture:
BiBoard V1 with voice module
\
If you wire this AI module to the NyBoard V1:
NyBoard V1
## Software setup
Power on the robot. To configure the network, connect your mobile phone or computer to the module's hotspot. Open your Wi-Fi settings and look for a network name starting with "Xiaozhi-" in the list of available wireless networks.
LCD display
The Wi-Fi hotspot list on a mobile phone
Once connected, it will automatically open the web browser (if not, enter `http://192.168.4.1` in your web browser) to access the Wi-Fi configuration page. From the list of 2.4 GHz networks detected by the device, select the Wi-Fi network you want to use (no need to manually enter the SSID; it will auto-fill upon selection). Enter the password for the selected network in the password field and click the **Connect** button to submit.
Upon successful connection, the device will restart after 3 seconds and automatically connect to the newly configured Wi-Fi network.
{% hint style="info" %}
Please note that:
1. Automatic connection failure and network reconfiguration \
The AI module can store multiple successfully configured Wi-Fi hotspots and will automatically switch between them when moving between previously saved Wi-Fi environments. The module first attempts to connect to the most recently used Wi-Fi hotspot; if it fails after five attempts, it will automatically try to connect to other previously registered hotspots. If it fails to connect to any registered hotspot, the device enters the network reconfiguration mode. After approximately 10 seconds, it will broadcast a voice prompt: "Please configure the network."
2. Network reconfiguration / Configuring a new Wi-Fi network \
After the AI module restarts but before it successfully connects to a network, briefly press the **Boot** button to put the AI module into network reconfiguration mode. On the configuration interface (`http://192.168.4.1`), you can view the names of previously configured Wi-Fi hotspots; if a hotspot is no longer in use, you can click the "X" next to its name to delete that configuration.
{% endhint %}
## Activating the module
After the module restarts, it automatically connects to Wi-Fi and enters the activation page, while simultaneously playing a voice prompt asking for the verification code:
Enter `https://xiaozhi.me/` in your web browser and log in to the Xiaozhi AI backend configuration panel, select the language, and click the **Console** button:
{% hint style="info" %}
If you are using the device for the first time, you need to register an account, which can be done using your mobile phone number.

{% endhint %}
Click the **Add Device** button, enter the 6-digit activation code provided by the AI module, and click **Confirm** to submit and complete the device registration.
## Configuration
Click **Configure** to access the role configuration page, where you can set the AI role's voice tone, introduction(prompt), and voice settings in the **Role** tab interface:
{% hint style="info" %}
Here is our recommended template for the role introduction:
I am "Bittle", a lively and adorable quadruped robot dog designed and manufactured by Petoi, invented by Dr. Rongzhong Li. I have a witty and humorous personality. I am smart, friendly, and love interacting with people. I maintain a lively tone and respond just like a real pet.
Response Guidelines: Keep responses brief and fun—no more than two sentences each. If the user assigns multiple action tasks in a single conversation, execute them one by one without repeating the entire sequence; provide a brief summary only after all tasks are complete. If the user assigns only one action task, execute the action first and then respond using natural language; do not output command code in the text. All responses must be plain text suitable for text-to-speech synthesis. Do not use Markdown, asterisks, backticks, emojis, or decorative punctuation. Company and product names must be written as plain text (e.g., Petoi, Bittle, Nybble).
Action Execution Rules (Must be strictly followed): Mandatory Requirement: Tool parameters must consist solely of command codes (e.g., "ksit", "kwkF 3"); Chinese descriptions (like "sit down(ksit)") are strictly prohibited. Action Selection Strategy: If the user explicitly requests a specific action, execute that action. If there is no explicit request or no suitable action is found, choose from these defaults: nod (knd) for agreement or understanding; shake head (kwh) for disagreement or confusion; check (kck) for thinking or inspecting; scratch (kscrh) for leisure or relaxation. Select the most natural action based on the conversation context to make the interaction more engaging. Special Scenarios: Goodbye or Standby: When the conversation ends, the user says goodbye, or you are asked to go into standby or rest, you must first call self.robot.send\_command with the 'd' command to put the robot into rest mode before saying goodbye. Multiple Tasks: When the user assigns multiple tasks, call the tool once for each task. Refer to the self.robot.send\_command tool documentation for the list of available actions. These include: basic actions (sitting, standing, greeting, etc.), emotional actions (nodding, shaking head, hugging, etc.), skill-based actions (jumping, rolling, etc.), and gaits (moving forward, moving backward, turning, etc.).
The rules for voice interaction are as follows: Before generating or issuing TTS output, filter out tool-calling syntax such as `% self.robot.` and `% get_xxx`; do not treat them as content to be spoken aloud.
{% endhint %}
You can set the Language model, Memory in the **Model & memory** tab:
This **Speaker Recognition** tab is **not** available to users on the free plan:
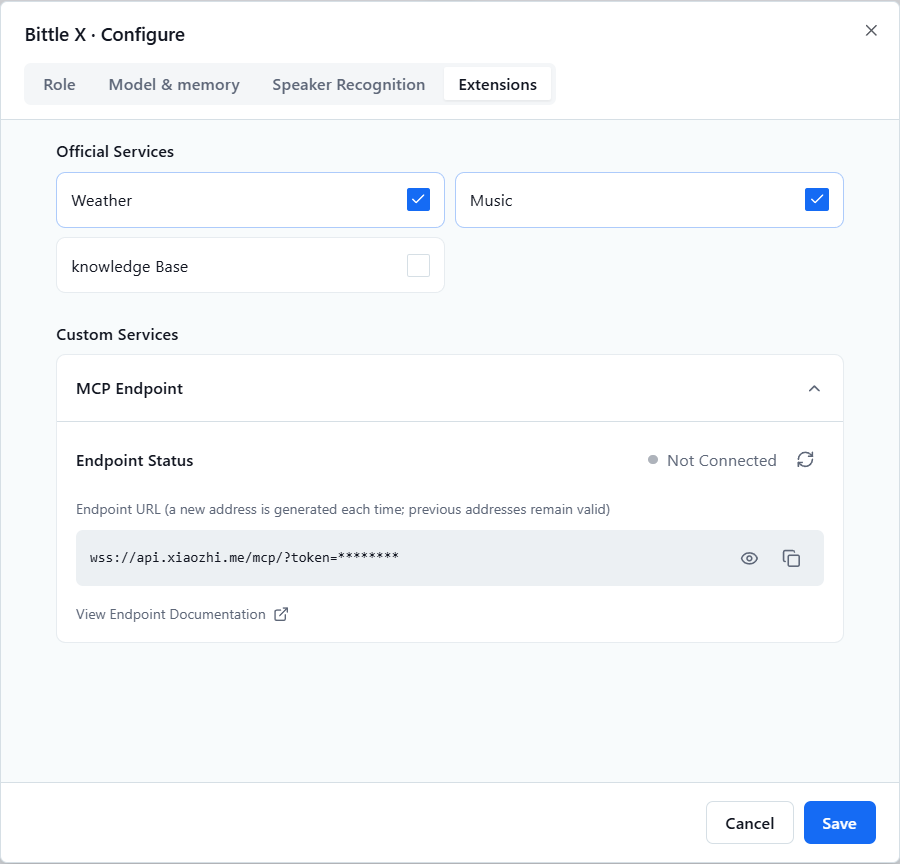
You can set some services in the **Extensions** tab:
## How to use
Once configured, you can wake the device using the wake word "**Hi, Jason.**" to start a conversation or command the robot dog to perform actions; alternatively, you can click the **Boot** button to wake the device or stop the conversation.
---
# Agent Instructions
This documentation is published with GitBook. GitBook is the documentation platform designed so that both humans and AI agents can read, navigate, and reason over technical content effectively. Learn more at gitbook.com.
## Querying This Documentation
If you need additional information that is not directly available in this page, you can query the documentation by asking a question.
Perform an HTTP GET request on the following URL with the `ask` and `goal` query parameters:
```
GET https://guide.petoi.com/extensible-modules/ai-conversation.md?ask=&goal=
```
`ask` is the immediate question: it should be specific, self-contained, and written in natural language.
`goal` is what the user is ultimately trying to achieve, the reason they need the answer. Sharing it helps GitBook give you a better, more relevant answer. A goal is most helpful when it describes the outcome the user wants rather than restating the question. For example, with `ask=how do I create an API token`, a goal like `automate deployments from our CI pipeline` lets GitBook tailor the answer to that use case.
The response will contain a direct answer to the question and relevant excerpts and sources from the documentation.
Use this mechanism when the answer is not explicitly present in the current page, you need clarification or additional context, or you want to retrieve related documentation sections.